Getting Started
This article provides a beginner-friendly tutorial for setting up and compiling a Union project. Instructions for installing Union SDK are located at Union SDK.
Creating Union plugin
Create a Visual Studio project
To create a Union plugin project inside Visual Studio we need to use File -> New -> Project. On the next screen, we select "Union Plugin 1.0m", and click Next. For the project configuration, we should choose:
| Key | Value |
|---|---|
| Project name | eg. MyPlugin |
| Location | Directory where to store the source code |
| Solution | Create new solution |
| Solution name | eg. MyPlugin |
We will also check "Place solution and project in the same directory" because our plugin consists of only one project, so there is no need to complicate the file structure.
File Structure
| Folder / File | Description |
|---|---|
| Engine SDK/ | In this folder, we have the Gothic Engine API in the form of header files. Most of the files between engines are very similar to each other but they can't be used interchangeably because each engine has slightly different API and addresses of functions. |
| Engine SDK/User API/ | These are empty files that are included in the corresponding engine headers. There are meant for placing additional methods extending classes that can be used for example in Hooks. |
| Plugin/System/ | DLL entry point generated by Union. We shouldn't modify anything here. |
| Plugin/Workspace/Interface/ | These are header files containing headers and source files important in correct order and an Interface.cpp file that merges all the code into one file. |
| Plugin/Workspace/Plugin/ | Finally, this is the source code of the plugin and especially Plugin.cpp where we can create code executed on Game Events. |
Build Configuration
Each Union plugin may target one or many versions of the Gothic engine and to select the proper API, Union SDK defines several build configurations for every engine, configuration, and also multiplatform build options. Each Target/Configuration combination is named [ENGINE] [CONFIGURATION].
Configurations:
- Debug: Unoptimized build with debug symbols for development.
- MD Release: Optimized build for release versions. Runtime Library: Multi-threaded DLL (/MD)
- MT Release: Optimized build for release versions. Runtime Library: Multi-threaded (/MT)
Engines:
- G1: Gothic I
- G1A: Gothic Sequel
- G2: Gothic II
- G2A: Gothic II NotR
- MP x2: Multiplatform target for both Gothic I (G1) and Gothic II NotR (G2A)
- MP x4: Multiplatform target for all engine versions (Gothic I, Gothic Sequel, Gothic II, Gothic II NotR)
For learning Union, it's suggested to select G2A Debug for Gothic II NotR or G1 Debug for Gothic I.
Project Configuration
The Union plugin is a regular C++ Visual Studio project so it's possible to configure the project, compiler, linker, and debugger as we wish by going into Project -> Properties. For a starter, we should go to the General tab and check if Platform Toolset is installed and selected. If not, we should select one that's available on our system. Union was created with v100 but it also supports the newest toolkits, so it's best to select a modern one.
In the General tab, we can also specify the Output Directory where the plugin DLL will be placed after the build. During development, we can set it to <GOTHIC_DIR>/System/Autorun where <GOTHIC_DIR> is the root folder of the Gothic installation with Union that we will use for testing. Each DLL file placed in System/Autorun is automatically loaded by Union runtime.
Another method is to put the DLL in the System directory and modify Gothic.ini to include
Build the plugin
After the initial configuration, we are ready to code something and see if our configuration is working. Let's collect some information about Union and display it with a MessageBox when the game starts. To do so, we locate the Plugin.cpp file and put our logic in one of the Game Events handlers. The best for that is Game_Init() because it's executed right after the engine loads every DAT file but before anything else:
Now we can Build (F7) the project to create the DLL. If we have set up Output Directory before, the plugin will deploy directly to the game. Otherwise, we can copy it manually from Bin to <GOTHIC_DIR>/System/Autorun/MyPlugin.dll. When we launch the game, a MessageBox should appear right before the main menu: 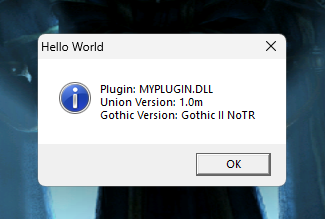
Couldn't build the plugin?
If you could not build the plugin or it crashed the game, you have to do some debugging and find the root cause of that. For compilation errors look at the Visual Studio Output tab and read the errors.
If they say something about missing toolset, make sure that you selected a Platform Toolset that's installed.
If the proper toolset is selected but doesn't work, make sure that you are configuring the same Configuration that is used for building.
If the plugin was built but the game crashed, you probably selected Configuration for the wrong platform. Gothic 2 Night of the Raven is G2A and doesn't work with G2 or G1A. If you are playing Gothic II Classic from Steam, please be advised that it still uses the Night of The Raven engine so the plugin must target G2A.
Debugging
Union plugins are regular DLLs with executable code hooked to Gothic.exe and running on it, so they can be debugged using the same techniques as any other software.
Visual Studio Debugger
Visual Studio Debugger lets us set breakpoints on any line of code to stop the execution when we reach it. It also gives us a lot of information about the program state at this point. To use the debugger we only need to attach it to the Gothic.exe progress and compile the plugin with Debug configuration.
Option #1: Open Project -> Properties and in the Debugging tab, set Command to the path of our Gothic.exe. Then we can run "Local Windows Debugger" in Visual Studio and it starts Gothic with a debugger attached automatically.
Option #2: Open Debug -> Attach to process... and filter process list by "Gothic". Run the game separately and when the process appears in Visual Studio, select it and attach to it.
Caveats:
- If we attach to the process early, we may get an "Exception thrown at 0x7B11DB86 (Shw32.dll) in Gothic2.exe: 0xC0000005: Access violation writing location 0x00ABD000." right at the beginning. It's fine, just click Continue and Gothic will start properly.
- If a breakpoint hits when our cursor is locked by Gothic, we may not be able to get the cursor back until execution continues. In this case, we can still use Alt+Tab to switch to Visual Studio and use F5 to continue or F10 to step over. Disabling mouse support in the config may also fix this problem.
Print Debugging
Printing to some output is probably the simplest form of debugging and Union provides us with several choices.
Logging to zSPY
zSPY can be accessed using a global zerr object. zSPY uses a message filtering system based on the first letter of the message, so our logs should follow the standard format used by other parts of ZenGine. Otherwise, the message may not be visible.
Logging to Union console
Union console needs to be enabled inside SystemPack.ini first:
cmd object behaving like C++ std::cout to log into the Union console: Logging to Visual Studio
Visual Studio can also receive logs from our plugin using: